Easy Raspberry Pi IoT Cloud Setup: A Free Guide!
Ever wondered if you could harness the power of the cloud using a device that fits in the palm of your hand? You absolutely can, and the Raspberry Pi is your gateway. Forget limitations; embrace a world where your tiny computer interacts with the vast expanse of the internet, creating limitless possibilities for innovation and automation.
The Raspberry Pi, a marvel of engineering and affordability, has become the darling of hobbyists, educators, and professionals alike. Its versatility stems from its ability to run a multitude of operating systems, from the familiar Raspbian (a Debian Linux derivative) to Android, Windows 10 IoT Core, and more. This adaptability, combined with its compact size and low power consumption, makes it an ideal candidate for a wide range of Internet of Things (IoT) projects. However, the true power of the Raspberry Pi is unleashed when it connects to the cloud. This connection allows for remote monitoring, data analysis, and control of devices, transforming simple projects into sophisticated, interconnected systems.
| Attribute | Description |
|---|---|
| Name | Eben Upton |
| Born | 1978 (age 45-46) |
| Education |
|
| Occupation | Engineer, businessman, academic |
| Known for | Co-founding the Raspberry Pi Foundation |
| Website | Raspberry Pi Foundation - About Us |
One of the initial hurdles many face is choosing the right cloud platform. While options like Amazon AWS IoT, Microsoft Azure IoT Hub, and Google IoT Cloud abound, navigating their complexities can be daunting. Google IoT Cloud, for instance, is often cited as being particularly challenging to set up, demanding significant installation and configuration before a Raspberry Pi can successfully communicate with it. The good news is that alternatives exist, offering varying degrees of user-friendliness and cost-effectiveness. The key is to identify a platform that aligns with your project's specific needs and your level of technical expertise.
- Ullu Web Series 2025 Whats New Trending On The App
- Prmovies 123movies Your Guide To Free Movie Streaming Alternatives
For those seeking a more streamlined experience, Azure IoT Hub provides a robust and relatively straightforward path for connecting a Raspberry Pi running Raspberry Pi OS to the cloud. Whether you opt for a physical Raspberry Pi device or an online device emulator, Azure IoT Hub simplifies the process of device registration, data ingestion, and remote management. Moreover, new users often benefit from cloud credits (like the $300 offered by some platforms) and generous free tiers, allowing ample opportunity for experimentation without incurring significant costs. Keep in mind, though, that mobile apps and server components are frequently updated, so staying abreast of the latest changes is essential for maintaining a stable and secure connection.
The beauty of the Raspberry Pi ecosystem lies in its open-source nature and the vibrant community that supports it. Countless guides, tutorials, and forum discussions offer assistance for virtually any IoT project imaginable. From automating home appliances to building sophisticated environmental monitoring systems, the possibilities are limited only by your imagination. And with the rise of containerization technologies like Docker, deploying applications on a Raspberry Pi has become simpler than ever. Docker containers encapsulate all the necessary dependencies for an application, ensuring that it runs consistently across different environments. This is a perfect introduction to containerization for those new to the concept!
However, remember that while cloud connectivity offers immense advantages, it's not always necessary. For certain IoT projects, a local server solution might be more appropriate. Blynk, for example, provides a platform for creating mobile app interfaces for controlling IoT devices. Importantly, a Blynk local server operates independently of the Blynk cloud server. This means that data is processed locally, without being transmitted to the internet, offering enhanced security and privacy. Configuring a Blynk local server on a Raspberry Pi is a straightforward process, making it an attractive option for projects where data security is paramount.
- Ullu Web Series Your Guide To The Best Shows More
- David Rebecca Muirs Wedding Love Story Photos Revealed
Regardless of whether you choose a cloud-based or local server approach, security should always be a top priority. Implement strong passwords, keep your software up to date, and carefully consider the permissions granted to different applications and services. Remember, the Raspberry Pi is a fully functional computer, and like any computer, it is vulnerable to security threats if not properly secured. By taking proactive steps to protect your device, you can ensure the integrity and confidentiality of your data.
The hardware landscape for Raspberry Pi-based IoT projects is vast and diverse. Beyond the Raspberry Pi itself, a plethora of boards, shields, and carriers are available, offering a wide range of functionalities. When selecting hardware components, consider the specific requirements of your project. For example, if you plan to interact with physical sensors or actuators, you'll need a way to connect them to the Raspberry Pi's GPIO (General Purpose Input/Output) pins. Breadboards, LEDs, resistors, and jumper wires are essential for prototyping and experimenting with different circuit designs. A Raspberry Pi extension board can simplify the process of connecting external components and provide additional features, such as voltage regulation and protection circuits.
For those venturing into the world of IoT development, a starter kit can be an excellent investment. These kits typically include a Raspberry Pi board, a breadboard, LEDs, resistors, jumper wires, and other essential components, providing everything you need to get started. Some kits even include a Raspberry Pi extension board and a forty-pin cable extension, making it even easier to connect external devices. By purchasing a kit, you can save time and effort by avoiding the need to source individual components.
Once you have your hardware in place, you'll need to choose a programming language and development environment. Python is a popular choice for Raspberry Pi-based IoT projects, thanks to its ease of use, extensive libraries, and large community support. Node.js, a JavaScript runtime environment, is another excellent option, particularly for projects that involve web-based interfaces or real-time data processing. Regardless of the language you choose, be sure to familiarize yourself with the relevant libraries and frameworks for interacting with the Raspberry Pi's GPIO pins and the cloud platform of your choice.
Connecting a Raspberry Pi to the cloud typically involves several steps. First, you'll need to create an account with a cloud provider, such as Amazon AWS, Microsoft Azure, or Google Cloud Platform. Then, you'll need to create an IoT hub or similar service within the cloud platform. This hub will act as a central point for connecting and managing your Raspberry Pi devices. Next, you'll need to install the necessary software libraries and tools on your Raspberry Pi. These libraries will allow your Raspberry Pi to communicate with the cloud platform using protocols such as MQTT or HTTP. Finally, you'll need to write code that sends data from your Raspberry Pi to the cloud and receives commands from the cloud. This code will typically involve using the libraries you installed in the previous step.
For example, if you're using Azure IoT Hub, you can use the Azure IoT SDK for Python to connect your Raspberry Pi to the cloud. This SDK provides a set of functions for sending telemetry data, receiving commands, and managing device twins. To get started, you'll need to install the SDK on your Raspberry Pi using pip, the Python package installer. Then, you can use the SDK to create a device client, which will handle the communication with Azure IoT Hub. Once you have a device client, you can use it to send telemetry data to the cloud using the send_message function. You can also use it to receive commands from the cloud using the on_message_received callback function.
Alternatively, you can use Node.js to connect your Raspberry Pi to the cloud. The Azure IoT SDK for Node.js provides a similar set of functions for sending telemetry data, receiving commands, and managing device twins. To get started, you'll need to install the SDK on your Raspberry Pi using npm, the Node.js package manager. Then, you can use the SDK to create a device client, which will handle the communication with Azure IoT Hub. Once you have a device client, you can use it to send telemetry data to the cloud using the sendEvent function. You can also use it to receive commands from the cloud using the on('message', ...) event handler.
In addition to Azure IoT Hub, other cloud platforms offer similar services for connecting Raspberry Pi devices to the cloud. Amazon AWS IoT, for example, provides a service called IoT Core, which allows you to connect, manage, and secure your IoT devices. Google Cloud Platform provides a similar service called Cloud IoT Core. Regardless of the cloud platform you choose, the basic principles of connecting a Raspberry Pi to the cloud remain the same. You'll need to create an account with the cloud provider, create an IoT hub or similar service, install the necessary software libraries and tools on your Raspberry Pi, and write code that sends data from your Raspberry Pi to the cloud and receives commands from the cloud.
Beyond the cloud platforms themselves, several other tools and services can help you build and deploy Raspberry Pi-based IoT projects. Node-RED, for example, is a visual programming tool that allows you to create IoT applications by dragging and dropping nodes onto a canvas. Node-RED supports a wide range of protocols and services, including MQTT, HTTP, and cloud platforms like Amazon AWS IoT and Microsoft Azure IoT Hub. With Node-RED, you can quickly create complex IoT applications without writing a single line of code. You can export your flows for deployment on various platforms, from Raspberry Pis to cloud servers.
Home Assistant is another popular open-source home automation platform that can be installed on a Raspberry Pi. Home Assistant allows you to control and automate your smart home devices, such as lights, thermostats, and door locks. It supports a wide range of devices and services, including Zigbee, Z-Wave, and cloud platforms like Amazon Alexa and Google Assistant. With Home Assistant, you can create custom automations that trigger based on events, such as the time of day, the weather, or the status of a device. Companion mobile apps use the official Home Assistant apps, a convenient companion to quickly control your devices and be notified when things happen in your home, even on your wrist using the Apple Watch.
Blynk is a platform that simplifies the creation of mobile app interfaces for controlling IoT devices. With Blynk, you can create custom dashboards with buttons, sliders, and gauges to control your Raspberry Pi-based IoT projects from your smartphone or tablet. Blynk provides a library for Raspberry Pi that allows you to easily interface with the GPIO pins and send data to the Blynk cloud. You can use Blynk to control LEDs, motors, sensors, and other devices connected to your Raspberry Pi. Blynk allows you to add up to 5 IoT devices for free, comes with a selection of free mobile apps for Android and iOS, gives you some limited free cloud data storage and libraries to work with the hardware of your choice.
For those concerned about privacy and security, a local Blynk server can be a good option. A local Blynk server runs on your Raspberry Pi and processes all data locally, without sending it to the cloud. This can be useful for projects where you need to keep your data private or where you don't have a reliable internet connection. Configuring a Blynk local server on a Raspberry Pi is a straightforward process, and it provides a secure and private way to control your IoT devices.
No matter what type of IoT project you're building, the Raspberry Pi provides a cost-effective and versatile platform for connecting your devices to the cloud. With its low price, small size, and wide range of features, the Raspberry Pi is an ideal choice for hobbyists, educators, and professionals alike. By leveraging the power of the cloud, you can transform simple Raspberry Pi projects into sophisticated, interconnected systems that can automate tasks, monitor environments, and improve efficiency. Whether you're building a smart home, an industrial automation system, or a scientific research project, the Raspberry Pi and the cloud can help you achieve your goals.
The Raspberry Pi has undergone several iterations, each offering improvements in performance and features. Models like the Raspberry Pi 3 and Raspberry Pi Zero are particularly popular due to their balance of performance, size, and cost. The Raspberry Pi 3 offers a significant performance boost over previous models, making it suitable for more demanding applications. The Raspberry Pi Zero, on the other hand, is incredibly small and inexpensive, making it ideal for projects where size and cost are critical. Table 1 shows the list of raspberry models released over the years and their prices.
In the realm of IoT platforms, a plethora of options exist, each with its own set of features and capabilities. Researching and comparing these platforms is essential for finding the one that best suits your project's needs. Consider factors such as ease of use, cost, scalability, security, and integration with other services. Some platforms are better suited for small-scale projects, while others are designed for large-scale deployments. By carefully evaluating your requirements, you can choose an IoT platform that will help you build and deploy your Raspberry Pi-based projects successfully. There are a lot of iot platforms out there, refer my post on iot platform companies to get the list of top iot platforms and best iot platform open source or free iot platform and their key features.
Ultimately, the key to success with Raspberry Pi-based IoT projects is to start small, experiment often, and learn from your mistakes. Don't be afraid to try new things and to push the boundaries of what's possible. The Raspberry Pi community is a valuable resource for help and inspiration, so don't hesitate to ask questions and share your experiences. With a little bit of effort and creativity, you can unlock the full potential of the Raspberry Pi and create innovative IoT solutions that can transform the world around you. Export your flows for deployment on various platforms, from raspberry pis to cloud servers. Get help and inspiration from a thriving community of developers and users.
Consider the power of automating and streamlining your IoT device deployment process. Secure device enrollment, automated firmware builds, and over-the-air (OTA) updates can be achieved with a single, comprehensive package. This simplifies the management of your devices and ensures they remain secure and up-to-date. Whether you're a tech enthusiast, a hobbyist, or just someone curious about how this little device can revolutionize your smart home or business, youve come to the right place.
- Tamilblasters Guide Stream Tamil Movies More Updated
- Annetta Halvorson Facebook Obituary More Discover Now
How to Set Up Your Own Raspberry Pi Zero Cloud Server with Nextcloud

IoT Edge device Raspberry Pi 3 Download Scientific Diagram
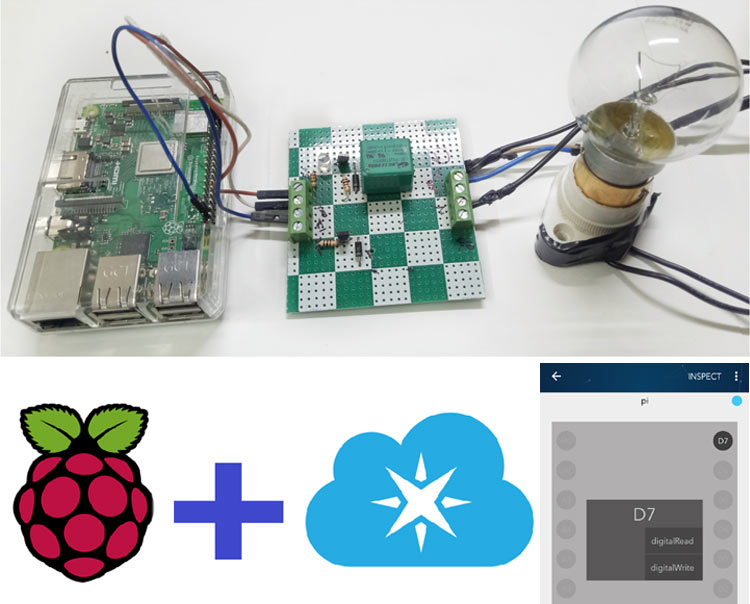
IoT controlled Home Automation Project using Raspberry Pi and Particle
