Easy Guide: Remote SSH IoT Behind Firewall Ubuntu Example
Ever felt locked out of your own IoT devices simply because they're hiding behind a firewall? Gaining secure remote access to IoT devices nestled behind firewalls on Ubuntu systems is not only achievable, but absolutely essential for effective management and security. This capability unlocks a world of possibilities, from proactive issue resolution to seamless data management, all while maintaining robust security protocols.
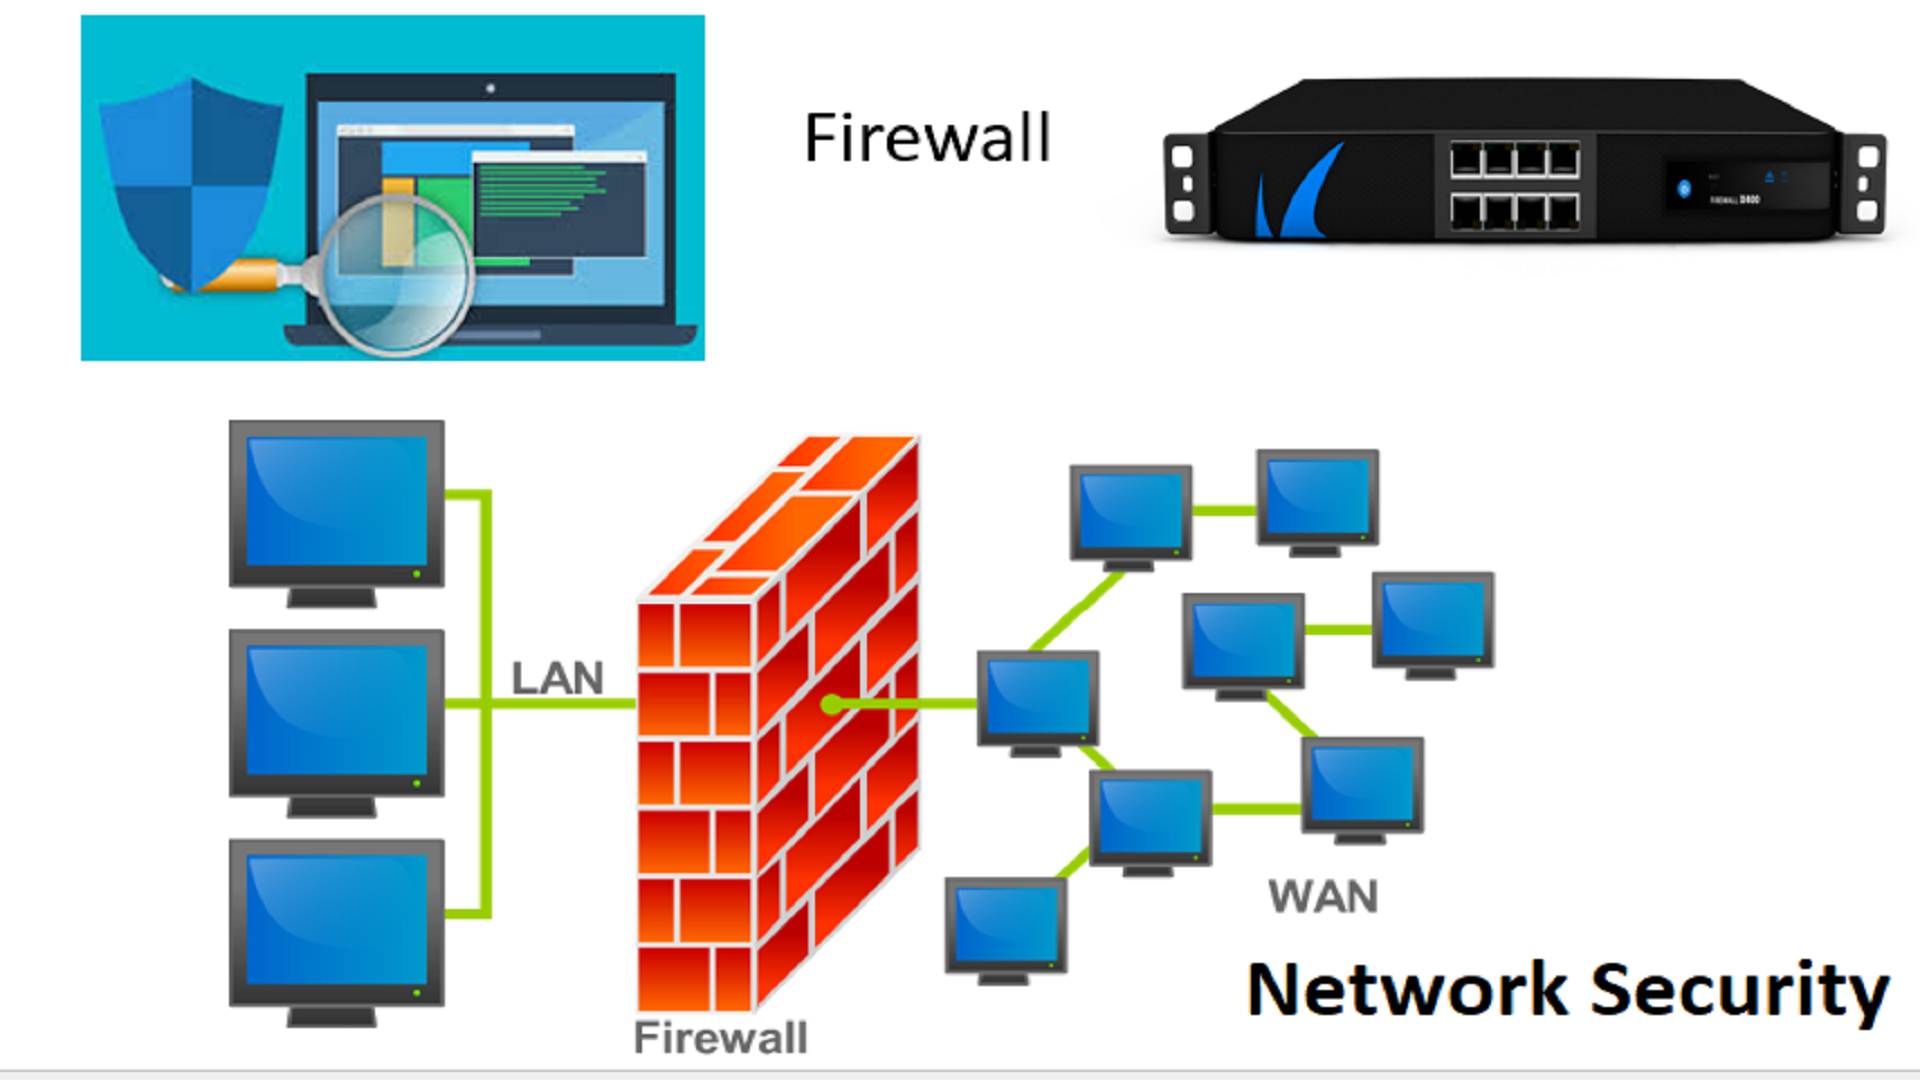
The challenge stems from the very nature of firewalls, which act as gatekeepers, meticulously scrutinizing and often blocking unsolicited incoming traffic. This inherent protection, while vital, can inadvertently create barriers to legitimate remote access, particularly for IoT devices deployed in environments where direct connections are restricted. Overcoming this hurdle requires a nuanced understanding of networking principles, security best practices, and the powerful capabilities of Secure Shell (SSH) tunneling.
| Category | Information |
|---|---|
| Topic | Remote SSH IoT behind Firewall Ubuntu Example |
| Core Concepts | Secure Remote Access, SSH Tunneling, Firewall Configuration, Ubuntu Server Management, IoT Security |
| Key Technologies | SSH, Ubuntu, Firewalls (e.g., UFW), IoT Devices, Port Forwarding, Reverse Tunneling |
| Benefits | Remote Device Management, Enhanced Security, Proactive Issue Resolution, Data Accessibility, Cost Reduction |
| Challenges | Firewall Restrictions, Network Complexity, Security Risks, Configuration Errors, Performance Overhead |
| Security Best Practices | Key-Based Authentication, Disabling Password Authentication, Regular Security Audits, Using Strong Passphrases, Limiting User Privileges |
| Example Use Cases | Remote Monitoring of Sensors, Controlling Industrial Equipment, Accessing Home Automation Systems, Managing Edge Computing Devices |
| Configuration Steps | Installing OpenSSH Server, Configuring Firewall Rules (UFW), Setting up SSH Keys, Configuring Port Forwarding or Reverse Tunneling |
| Troubleshooting | Connection Refused Errors, Authentication Failures, Firewall Blocking, Tunneling Issues, DNS Resolution Problems |
| Alternatives to SSH | VPNs, Remote Management Tools, Cloud-Based IoT Platforms |
| Further Reading | Ubuntu SSH Server Documentation |
This article serves as a comprehensive guide to navigating these complexities, offering practical examples and emphasizing essential security measures to ensure your IoT devices remain both accessible and secure. We'll delve into the intricacies of configuring SSH on Ubuntu, enabling you to establish secure, encrypted connections to devices nestled behind firewalls. This approach not only streamlines network setups but also fortifies your defenses against unauthorized access and potential security breaches.
- Hdhub4u 2025 Is It Safe Your Guide Legal Streaming Options
- Aditi Mistry Nude Video Truth Or Rumor Exploring The Controversy
At the heart of the matter lies the challenge of bypassing firewall restrictions without compromising security. When an IoT device resides behind a firewall, it's effectively shielded from direct incoming connections. The firewall acts as a vigilant gatekeeper, meticulously blocking any unsolicited traffic that attempts to reach the device. While this protection is essential for preventing unauthorized access, it also presents a significant hurdle for legitimate remote management and control.
To overcome this challenge, we'll explore various techniques, including port forwarding and SSH tunneling. Port forwarding involves configuring the firewall to redirect specific traffic, such as SSH connections, to the internal IP address of the IoT device. This approach allows you to bypass the firewall's default blocking behavior and establish a direct connection to the device. However, port forwarding can also introduce security risks if not implemented carefully, as it exposes the device to potential attacks from the outside world.
Alternatively, SSH tunneling provides a more secure and flexible solution for accessing IoT devices behind firewalls. SSH tunneling creates an encrypted connection between your local machine and the IoT device, effectively bypassing the firewall's restrictions. This technique relies on the SSH protocol's ability to forward traffic over an existing secure connection, ensuring that all data transmitted between your machine and the device remains protected from eavesdropping and tampering.
- Unlock Math Easily Symbolabs Stepbystep Solutions More
- Exploring The Haley Nicole Nude Controversy Facts Amp Ethics
Setting up Ubuntu for secure SSH connections involves several key steps, starting with the installation and configuration of the OpenSSH server. The OpenSSH server is the software that enables SSH connections on your Ubuntu device, allowing you to remotely access and manage the system. To install the OpenSSH server, you can use the following commands:
sudo apt updatesudo apt install openssh-server
These commands will update the package lists and install the OpenSSH server on your Ubuntu device. Once the installation is complete, you'll need to configure the SSH server to ensure it's running securely and efficiently. This involves modifying the SSH server configuration file, typically located at /etc/ssh/sshd_config.
Within the SSH server configuration file, you can adjust various settings to enhance security and performance. For example, you can disable password authentication and require users to authenticate using SSH keys. SSH keys provide a more secure alternative to passwords, as they're much more difficult to crack or guess. To generate an SSH key pair, you can use the following command:
ssh-keygen -t rsa -b 4096
This command will generate a 4096-bit RSA key pair, consisting of a private key and a public key. The private key should be kept secret and stored securely on your local machine, while the public key can be copied to the ~/.ssh/authorized_keys file on the Ubuntu device you want to access. Once you've copied the public key to the authorized_keys file, you can disable password authentication in the SSH server configuration file by setting the PasswordAuthentication option to no.
In addition to disabling password authentication, you can also restrict access to the SSH server by specifying the IP addresses or networks that are allowed to connect. This can be done using the AllowUsers or AllowGroups options in the SSH server configuration file. By limiting access to only trusted IP addresses or networks, you can significantly reduce the risk of unauthorized access to your Ubuntu device.
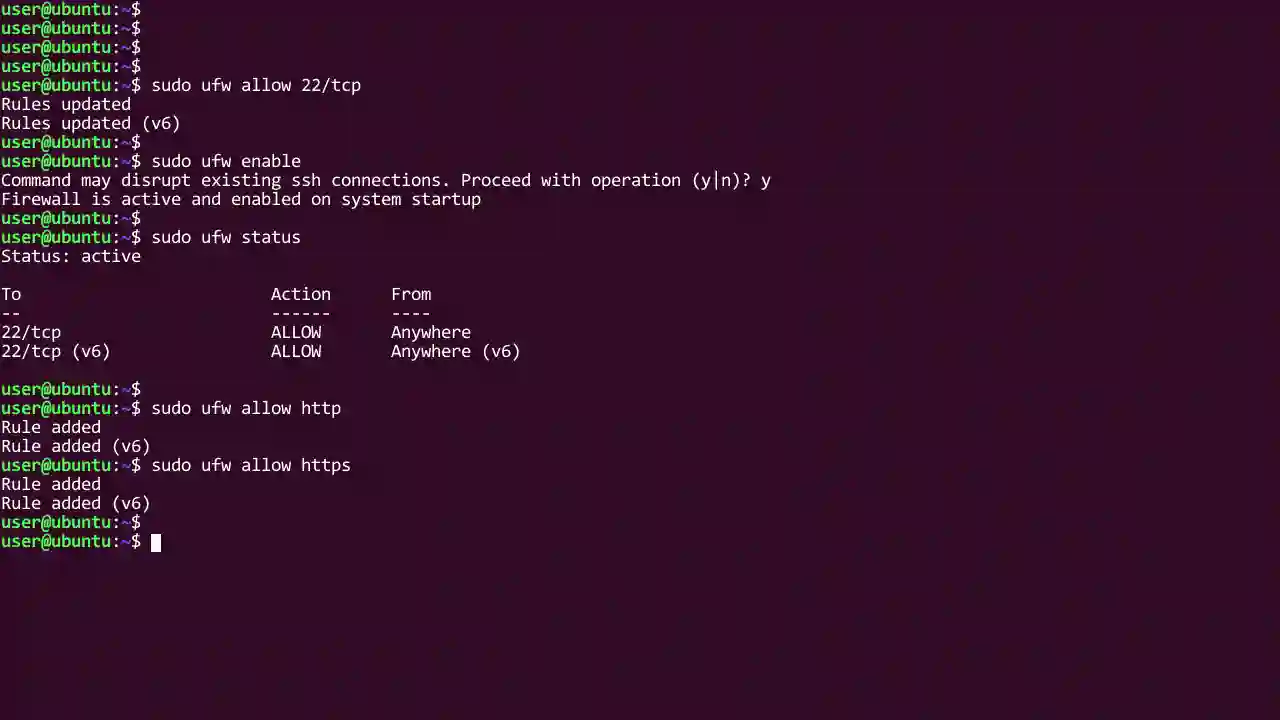
Once you've configured the SSH server, you'll need to configure the firewall to allow SSH connections. If you're using the UFW firewall, you can allow SSH connections by running the following command:
sudo ufw allow ssh
This command will add a rule to the UFW firewall that allows incoming SSH connections on port 22, the default port for SSH. If you've changed the default SSH port, you'll need to specify the new port number in the UFW rule. For example, if you've changed the SSH port to 2222, you would run the following command:
sudo ufw allow 2222/tcp
This command will allow incoming SSH connections on port 2222 using the TCP protocol. Once you've configured the firewall, you can test the SSH connection by attempting to connect to the Ubuntu device from your local machine. To connect to the device, you can use the following command:
ssh user@device_ip_address
Replace user with your username on the Ubuntu device and device_ip_address with the IP address of the device. If the connection is successful, you'll be prompted to enter your password or SSH key passphrase. Once you've authenticated, you'll be granted access to the Ubuntu device.
Now, let's delve into the practical application of SSH tunneling for accessing IoT devices behind firewalls. SSH tunneling, also known as port forwarding, allows you to create a secure, encrypted connection between your local machine and an IoT device that might otherwise be inaccessible due to firewall restrictions. This technique leverages the SSH protocol's ability to forward traffic over an existing secure connection, providing a safe and reliable way to bypass firewall limitations.
There are two primary types of SSH tunneling: local port forwarding and remote port forwarding. Local port forwarding allows you to access a service running on the IoT device from your local machine, while remote port forwarding allows you to access a service running on your local machine from the IoT device. In the context of accessing IoT devices behind firewalls, local port forwarding is typically the more relevant technique.
To create an SSH tunnel using local port forwarding, you can use the following command:
ssh -L local_port:device_ip_address:device_port user@gateway_ip_address
Replace local_port with the port number on your local machine that you want to use for the tunnel, device_ip_address with the internal IP address of the IoT device, device_port with the port number of the service you want to access on the device, user with your username on the gateway server, and gateway_ip_address with the IP address of the gateway server that has access to both your local machine and the IoT device.
For example, if you want to access a web server running on an IoT device with the IP address 192.168.1.100 on port 80, and your gateway server has the IP address 10.0.0.1, you can use the following command:
ssh -L 8080:192.168.1.100:80 user@10.0.0.1
This command will create an SSH tunnel that forwards traffic from port 8080 on your local machine to port 80 on the IoT device. Once the tunnel is established, you can access the web server on the IoT device by opening a web browser and navigating to http://localhost:8080.
In addition to local port forwarding, SSH also supports remote port forwarding, which allows you to access a service running on your local machine from the IoT device. To create an SSH tunnel using remote port forwarding, you can use the following command:
ssh -R remote_port:local_ip_address:local_port user@gateway_ip_address
Replace remote_port with the port number on the gateway server that you want to use for the tunnel, local_ip_address with the IP address of your local machine, local_port with the port number of the service you want to access on your local machine, user with your username on the gateway server, and gateway_ip_address with the IP address of the gateway server.
For example, if you want to allow the IoT device to access a web server running on your local machine with the IP address 192.168.1.100 on port 8080, and your gateway server has the IP address 10.0.0.1, you can use the following command:
ssh -R 80:192.168.1.100:8080 user@10.0.0.1
This command will create an SSH tunnel that forwards traffic from port 80 on the gateway server to port 8080 on your local machine. Once the tunnel is established, the IoT device can access the web server on your local machine by opening a web browser and navigating to http://gateway_ip_address.
When dealing with IoT devices behind routers or firewalls, you might encounter situations where direct SSH connections are not possible. In such cases, you can leverage port forwarding on the router to redirect SSH traffic to the device's internal IP address. This involves accessing the router's configuration interface and creating a port forwarding rule that maps an external port on the router to the internal IP address and port of the IoT device.
Alternatively, you can utilize SSH reverse tunneling to establish a connection back to your local machine. SSH reverse tunneling allows the IoT device to initiate a connection to your local machine, effectively bypassing the firewall's restrictions on incoming connections. This technique is particularly useful when the IoT device is located behind a NAT (Network Address Translation) firewall, which prevents external devices from directly connecting to internal devices.
To set up SSH reverse tunneling, you'll need to configure the IoT device to connect to your local machine using the SSH protocol. This involves installing an SSH client on the device and configuring it to connect to your local machine using a specific port. On your local machine, you'll need to run an SSH server that listens for incoming connections on the specified port. Once the connection is established, you can use SSH port forwarding to access the IoT device from your local machine.
Securing SSH access to IoT devices is paramount to prevent unauthorized access and protect sensitive data. Here are some essential best practices to follow:
- Disable Password Authentication: Password authentication is vulnerable to brute-force attacks and should be disabled in favor of SSH key-based authentication.
- Use Strong SSH Keys: Generate strong SSH keys with a key length of at least 2048 bits or higher.
- Protect Your Private Key: Store your private key securely and never share it with anyone.
- Restrict SSH Access: Limit SSH access to only trusted IP addresses or networks.
- Use a Non-Standard SSH Port: Change the default SSH port (22) to a non-standard port to reduce the risk of automated attacks.
- Keep SSH Software Updated: Regularly update the SSH server and client software to patch security vulnerabilities.
- Monitor SSH Logs: Monitor SSH logs for suspicious activity and potential security breaches.
- Implement Two-Factor Authentication: Consider implementing two-factor authentication for an extra layer of security.
- Use a Firewall: Configure a firewall to restrict access to the SSH port and other services.
- Regular Security Audits: Conduct regular security audits to identify and address potential vulnerabilities.
Remote IoT solutions offer a secure way to connect to devices while maintaining robust protection, even when they are protected by firewalls. These solutions are essential for managing devices deployed in remote locations or behind complex network configurations. They often incorporate features such as end-to-end encryption, secure authentication, and access control mechanisms to ensure the confidentiality and integrity of data transmitted between the devices and the management platform.
As the number of IoT devices continues to grow, the need for secure and reliable remote access solutions becomes increasingly critical. By following the best practices outlined in this guide, you can effectively manage and maintain your IoT devices from anywhere in the world, while ensuring they remain protected from unauthorized access and potential security threats. Remember that a proactive approach to security is essential for mitigating risks and maintaining the integrity of your IoT ecosystem.
The remote SSH IoT behind firewall Ubuntu example acts as a pivotal guide, demonstrating how to streamline network setups and ensure device security. In these tutorials, you'll learn how to remotely access a device that's behind a firewall. You can't start a direct SSH session into the device because the firewall blocks all inbound traffic. The tutorials show you how you can open a tunnel and then use that tunnel to start an SSH session to a remote device. Remote access IoT behind firewall is a concept that addresses the need to connect to IoT devices located within a secure environment.
As more devices connect to the internet, the need for secure and reliable remote access becomes paramount. This guide walks you through everything you need to know to set up remote SSH access to your Raspberry Pi, even when it's hidden behind a firewall. Remote SSH, VNC to Raspberry Pi behind firewall, allows you to manage and monitor IoT devices, set cloud alerts, and run batch jobs remotely. For example, when you connect, since the operating system comes with a strict security policy, you need to configure it properly.
Once SSH is configured, it's essential to follow best practices to maintain security and prevent unauthorized access. Many users face this challenge, especially when working with remote SSH Raspberry Pi behind firewall configurations on Ubuntu. But dont sweat ittoday, were diving deep into this topic and giving you all the tools you need to conquer this hurdle like a pro.
This article offers a comprehensive guide to SSH reverse tunneling, explaining its role in securely accessing local services from remote locations, even behind firewalls or NATs. It covers common use cases like remote IoT control, database access, and gaming, while also highlighting security best practices and alternatives such as VPNs and Pinggy, a tool that simplifies the tunneling process. This method is especially relevant when considering the deployment of IoT devices behind a firewall, a common scenario that adds another layer of complexity to the setup.
Below is a table that encapsulates critical information regarding the core components involved in establishing secure remote access for IoT devices using SSH on Ubuntu. Take full control of your Ubuntu Linux machine with our comprehensive guide to SSH remote access without port forwarding. Unlock the power of your Ubuntu Linux server from anywhere, anytime with our expert tips and tricks. The SSH remote IoT Raspberry Pi, free since the operating system comes with a strict security policy, requires careful configuration to ensure both accessibility and security.
- Masa49 Your Gateway To Reliable Online Resources More
- Dotmovies Your Guide Safe Movie Streaming Year
Mastering Remote SSH IoT Behind Firewall On Ubuntu For Free
Secure IoT Access SSH Behind Firewalls & Beyond

Secure SSH Remotely Access Raspberry Pi Behind Ubuntu Firewall Guide
