Primer: Pro Tips & Tricks For Flawless Application! [Guide]
Ever wondered why your makeup doesn't quite have that professional, airbrushed finish? Mastering the art of how to apply a primer is undeniably the secret weapon in achieving a flawless, long-lasting makeup look.
Think of primer as the unsung hero of your beauty arsenal. It's the crucial first step, the canvas preparation that dictates how well your foundation, concealer, and other products will perform throughout the day. Neglecting this step is like skipping the sanding before painting a piece of furniture you might get away with it, but the final result will inevitably show imperfections. Applying primer correctly isn't just about slapping on a product; it's about understanding its function and tailoring your technique to your individual skin type and makeup goals. Whether you're aiming for a dewy glow, a matte finish, or simply extending the wear time of your favorite foundation, primer is the key.
| Topic | Description |
|---|---|
| What is Primer? | A base product applied before makeup to create a smooth surface, enhance makeup application, and prolong wear. |
| Types of Primer | Face primer, nail primer, epoxy primer (for surfaces like metal). Different types serve different purposes. |
| Importance of Primer | Creates a smooth canvas, reduces the appearance of pores and fine lines, enhances makeup longevity, and helps makeup adhere better. |
| Application Techniques | Varies based on the type of primer. Generally involves cleaning the surface, applying a thin, even coat, and allowing it to dry before proceeding with other products. |
| Common Mistakes | Skipping primer altogether, applying too much primer, not letting primer dry completely before applying makeup, using the wrong type of primer for the skin type or makeup look. |
| Primer for Different Surfaces | Skin: Creates a smooth base for makeup. Nails: Improves adhesion of nail polish. Metal: Prevents rust and ensures better paint adhesion. |
| Benefits of Using Primer | Smoother makeup application, longer-lasting makeup, minimized pores and fine lines, improved skin texture appearance, and protection for surfaces like nails and metal. |
| Expert Tips | Spotting imperfections before priming, perfecting application technique for a smooth finish, choosing the right primer for your skin type, and ensuring the surface is properly prepared. |
Reference: Vogue
- Desi Mms The Rise Of A Digital Phenomenon Explained
- Filmyfly Amp More Your Guide To Latest Movie News Updated
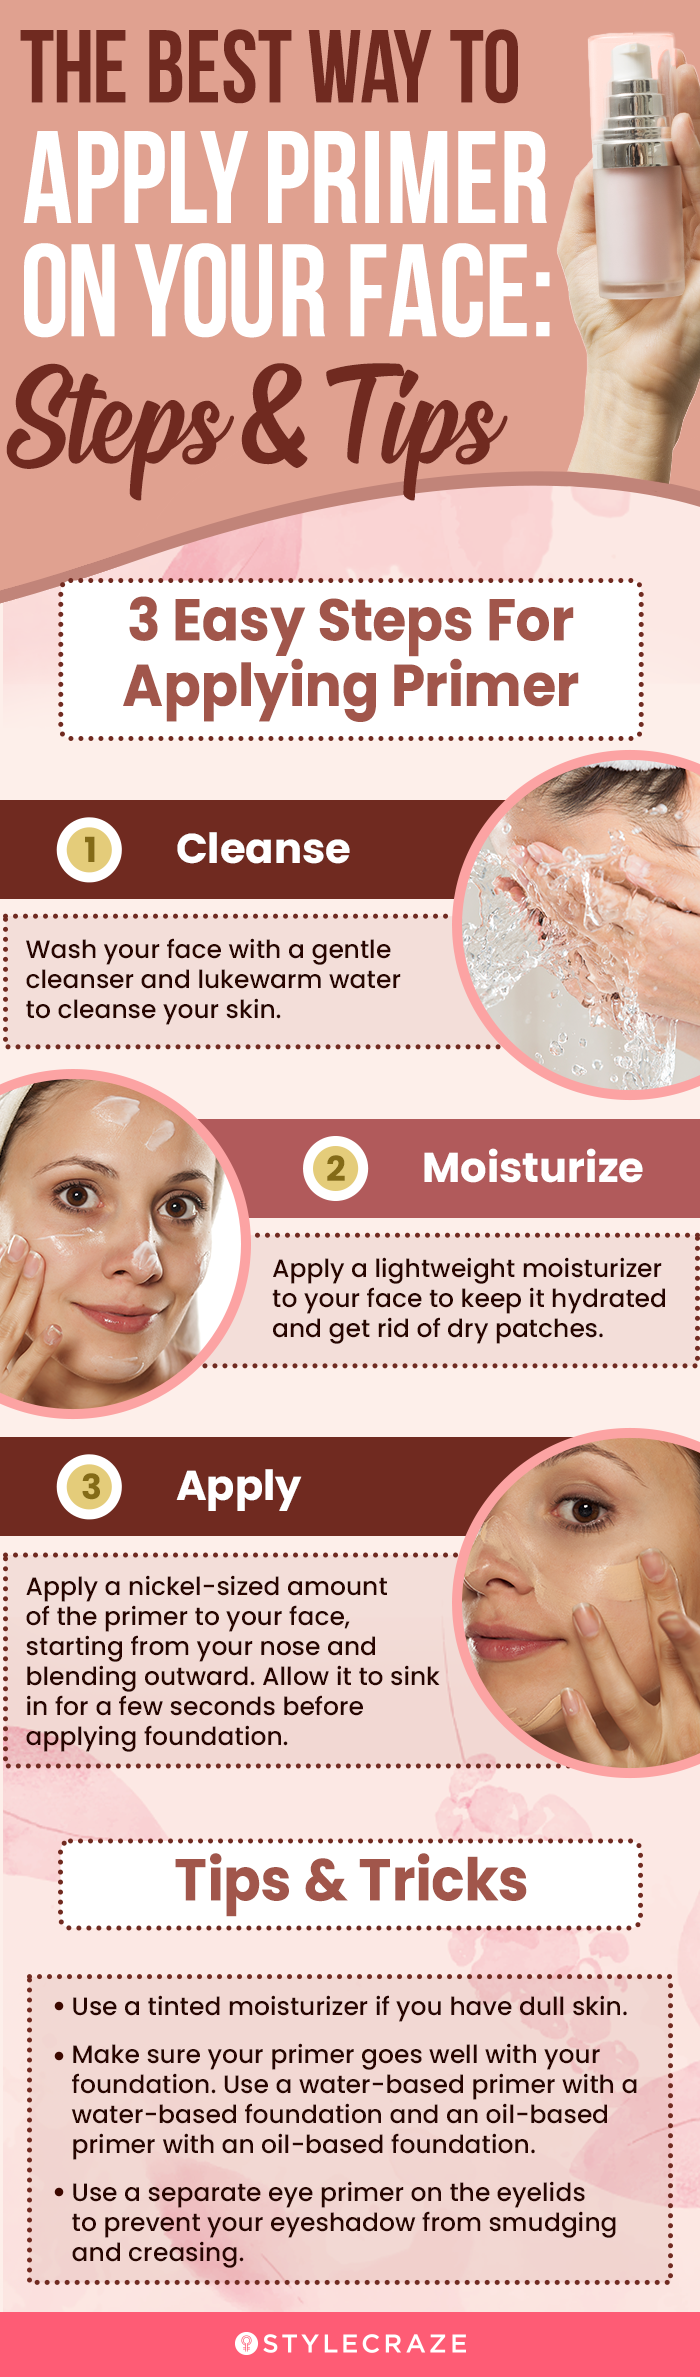
So, how do you elevate your makeup game from amateur to pro? It all starts with the right primer and the right application technique. Let's delve into the step-by-step guide to mastering this essential art.
Step 1: Skin Preparation The Foundation of Flawlessness Before you even think about reaching for your primer, the first and most crucial step is preparing your skin. Think of your face as a canvas that needs to be properly prepped before you can create a masterpiece. This means starting with a clean slate. Begin by cleansing your face with a gentle cleanser suited to your skin type. Whether you have oily, dry, combination, or sensitive skin, using the right cleanser will remove any dirt, oil, and impurities that can interfere with the primer's effectiveness. Follow up with a toner to balance your skin's pH levels and remove any remaining residue. Toners can also help to tighten pores and create a smoother surface for makeup application.
Once your skin is clean and toned, the next step is hydration. Even if you have oily skin, moisturizing is essential. Choose a lightweight, non-comedogenic moisturizer that won't clog your pores. Allow the moisturizer to fully absorb into your skin before moving on to the next step. This will create a hydrated and supple base for the primer, preventing it from clinging to dry patches and ensuring a smoother application. If you have dry skin, opt for a richer, more emollient moisturizer to provide ample hydration.
- Hdhub4u 2025 Is It Safe Your Guide Legal Streaming Options
- Mkvmoviespoint Your Guide To Bollywood More Year
Finally, consider using a serum to address any specific skin concerns you may have. Serums are concentrated treatments that can target issues such as fine lines, wrinkles, hyperpigmentation, and redness. Apply the serum after your toner and before your moisturizer, allowing it to fully absorb into your skin before proceeding. By addressing these concerns before applying primer, you can create a more even and flawless canvas for your makeup.
Step 2: Choosing the Right Primer A Primer for Every Purpose Just as there are different types of paint for different surfaces, there are different types of primers for different skin types and makeup goals. Understanding the different types of primers and their specific benefits is crucial for achieving a flawless finish. For oily skin, look for mattifying primers that contain ingredients like silica or charcoal. These primers help to absorb excess oil and control shine throughout the day, preventing your makeup from sliding off your face. They also often have a blurring effect, minimizing the appearance of pores and creating a smoother surface. For dry skin, opt for hydrating primers that contain ingredients like hyaluronic acid or glycerin. These primers help to replenish moisture and prevent your makeup from clinging to dry patches. They can also create a dewy, radiant finish that enhances your skin's natural glow.
If you have combination skin, you may want to use a combination of primers, applying a mattifying primer to oily areas like the T-zone and a hydrating primer to drier areas like the cheeks. For sensitive skin, look for fragrance-free and hypoallergenic primers that won't irritate your skin. These primers should be free of harsh chemicals and irritants that can cause redness, itching, or breakouts. In addition to primers for different skin types, there are also primers that address specific concerns such as redness, discoloration, and fine lines. Color-correcting primers can help to neutralize redness or brighten dull skin, while blurring primers can help to minimize the appearance of pores and fine lines. The key is to identify your skin type and makeup goals and choose a primer that addresses your specific needs.
Step 3: Application Technique The Devil is in the Details Now that you've prepped your skin and chosen the right primer, it's time to apply it. The application technique is just as important as the primer itself, as the wrong technique can lead to a streaky, uneven finish. Start by dispensing a small amount of primer onto your fingertips or the back of your hand. A pea-sized amount is usually sufficient for the entire face. Less is more when it comes to primer, as using too much can actually make your makeup look cakey and unnatural.
Using your fingertips, gently apply the primer to your face, starting in the center and working your way outwards. Use light, circular motions to blend the primer into your skin, paying particular attention to areas where you have enlarged pores, fine lines, or uneven texture. Avoid rubbing or tugging on your skin, as this can cause irritation and premature aging. If you prefer, you can also use a makeup brush or sponge to apply the primer. A synthetic brush or sponge is best, as it won't absorb as much product as a natural brush or sponge. Use the same light, circular motions to blend the primer into your skin, ensuring that it is evenly distributed. Once you've applied the primer to your entire face, allow it to set for a few minutes before applying your foundation. This will give the primer time to fully absorb into your skin and create a smooth, even base for your makeup.
Step 4: Addressing Specific Areas Targeting Imperfections While applying primer to your entire face is essential, there are certain areas that may require extra attention. For example, if you have enlarged pores around your nose or cheeks, you may want to use a pore-filling primer specifically designed to minimize their appearance. These primers typically contain silicone-based ingredients that fill in the pores and create a smoother surface. Apply the pore-filling primer to the affected areas using your fingertips or a small brush, gently pressing it into the pores. Allow it to set for a few minutes before applying your regular primer.
If you have fine lines around your eyes or mouth, you may want to use a line-filling primer to smooth out these wrinkles and prevent your makeup from settling into them. These primers typically contain light-reflecting particles that help to diffuse the appearance of lines and wrinkles. Apply the line-filling primer to the affected areas using your fingertips or a small brush, gently patting it into the skin. Avoid rubbing or tugging on your skin, as this can exacerbate the appearance of lines and wrinkles. If you have redness around your nose or cheeks, you may want to use a color-correcting primer to neutralize the redness. Green-tinted primers are particularly effective at neutralizing redness, as green is the opposite of red on the color wheel. Apply the green-tinted primer to the affected areas using your fingertips or a small brush, blending it well into your skin. Follow with your regular primer to create a smooth, even base for your makeup.
Step 5: Beyond the Face Priming for Nails and Surfaces The concept of priming extends far beyond just the face. Applying a primer to your nails before applying nail polish is essential for creating a smooth, long-lasting manicure. Nail primer helps to create a strong bond between the nail polish and the nail, preventing chipping and peeling. It also helps to even out the surface of the nail, creating a smoother base for the nail polish. To use nail primer, start by cleaning your nails with a nail polish remover to remove any oils or residue. Then, apply a thin coat of nail primer to each nail, allowing it to dry completely before applying your base coat. In addition to nails, primer is also used on various surfaces, such as metal, to prepare them for painting. Epoxy primer, for example, is commonly used on metal surfaces to prevent rust and ensure better paint adhesion. The process typically involves cleaning the surface to remove any dirt, grease, or rust, then applying a thin, even coat of epoxy primer using a brush or roller. The primer is then allowed to cure for a specified period before applying the topcoat.
Step 6: Troubleshooting Common Primer Problems and Solutions Even with the best primer and application technique, you may still encounter some common problems. One of the most common problems is pilling, which occurs when the primer forms small balls or flakes on the skin. This can be caused by using too much primer, not allowing the primer to fully absorb into the skin, or using incompatible products. To prevent pilling, use a small amount of primer and allow it to fully absorb into your skin before applying your foundation. Also, avoid using silicone-based primers with water-based foundations, as these products are not compatible and can cause pilling.
Another common problem is dryness, which can occur if you have dry skin or if you're using a mattifying primer. To prevent dryness, use a hydrating primer and apply a moisturizer before applying your primer. You can also try mixing a drop of facial oil into your primer to add extra hydration. If you have oily skin, you may experience shine or breakouts when using primer. To prevent shine, use a mattifying primer and blot your face with blotting papers throughout the day. To prevent breakouts, choose a non-comedogenic primer that won't clog your pores and cleanse your face thoroughly at the end of the day.
Step 7: Expert Tips and Tricks Taking Your Primer Game to the Next Level Once you've mastered the basics of applying primer, you can take your primer game to the next level with some expert tips and tricks. One tip is to use a damp sponge to apply your primer. This can help to create a smoother, more even finish and prevent the primer from settling into fine lines and wrinkles. Another tip is to mix your primer with your foundation for a dewy, radiant finish. This can help to sheer out your foundation and create a more natural look. You can also use primer as a spot treatment to target specific areas of concern, such as enlarged pores or redness. Simply apply a small amount of primer to the affected areas using your fingertips or a small brush. Finally, don't forget to experiment with different types of primers to find the ones that work best for your skin type and makeup goals. With a little practice and experimentation, you can master the art of applying primer and achieve a flawless, long-lasting makeup look.
Step 8: The Importance of Surface Preparation for Non-Makeup Applications While we've focused heavily on makeup primer, it's crucial to understand the parallel importance of surface preparation in other areas. For example, when painting a room, priming the walls is essential for a smooth, even finish and long-lasting color. Just like with makeup, the primer creates a uniform surface, hides imperfections, and helps the paint adhere better. The steps involve cleaning the walls, patching any holes or cracks, and then applying a coat of primer specifically designed for the type of paint you'll be using.
Similarly, in automotive painting, priming is a critical step. The primer not only protects the metal from corrosion but also provides a smooth surface for the topcoat. The process typically involves sanding the metal, applying a rust-resistant primer, and then sanding the primer before applying the paint. Skipping the priming step can result in a poor paint job that is prone to chipping, peeling, and rust. The lesson here is that regardless of the application, whether it's makeup, painting a house, or restoring a car, proper surface preparation, including the use of a primer, is essential for achieving a professional and long-lasting result.
Step 9: Understanding Primer Ingredients and Their Effects Diving deeper into the world of primers, it's beneficial to understand the ingredients commonly found in these products and how they interact with your skin. Silicone-based primers, often containing ingredients like dimethicone, are popular for their ability to create a smooth, silky texture on the skin. They work by filling in pores and fine lines, creating a flawless canvas for makeup application. However, some individuals may find that silicone-based primers can clog pores or cause breakouts, especially if they have sensitive or acne-prone skin.
Water-based primers, on the other hand, are often lighter and more hydrating than silicone-based primers. They typically contain ingredients like hyaluronic acid, glycerin, and aloe vera, which help to moisturize and soothe the skin. Water-based primers are a good choice for individuals with dry or dehydrated skin, as they can help to create a dewy, radiant finish. Oil-based primers are another option, particularly for individuals with very dry skin. These primers typically contain oils like argan oil, jojoba oil, or rosehip oil, which help to nourish and protect the skin. Oil-based primers can also create a luminous, glowing effect. Beyond these base types, many primers contain additional ingredients to address specific concerns. For example, some primers contain antioxidants like vitamin C and vitamin E, which help to protect the skin from free radical damage. Others contain peptides, which can help to stimulate collagen production and reduce the appearance of fine lines and wrinkles. By understanding the ingredients in your primer, you can choose a product that is best suited for your skin type and concerns.
Step 10: Sustainable Priming Practices Eco-Conscious Choices In today's world, it's important to consider the environmental impact of our beauty choices. Fortunately, there are many sustainable priming options available that are both effective and eco-friendly. Look for primers that are packaged in recyclable materials, such as glass or aluminum, rather than plastic. You can also choose primers that are formulated with natural and organic ingredients, which are less likely to contain harmful chemicals that can pollute the environment.
Many brands are now offering refillable primer options, which can help to reduce waste. With refillable primers, you purchase the initial container and then simply refill it with a new product when it runs out. This can significantly reduce the amount of plastic waste generated by your beauty routine. Another way to practice sustainable priming is to choose multi-tasking products. For example, you can use a tinted moisturizer with SPF as a primer, foundation, and sunscreen in one. This can help to streamline your beauty routine and reduce the number of products you need to purchase.
Step 11: Debunking Primer Myths Separating Fact from Fiction There are many myths and misconceptions surrounding primer, so it's important to separate fact from fiction. One common myth is that primer is only necessary for special occasions. In reality, primer can be beneficial for everyday use, as it helps to protect your skin from makeup and environmental pollutants. Another myth is that primer can replace moisturizer. While some primers do contain hydrating ingredients, they are not a substitute for a dedicated moisturizer. It's important to moisturize your skin before applying primer, regardless of your skin type.
Another myth is that all primers are created equal. In reality, there are many different types of primers, each with its own unique benefits. It's important to choose a primer that is suited for your skin type and concerns. Finally, there's a misconception that primer will magically transform your skin. While primer can improve the appearance of your skin, it's not a miracle product. It's important to have realistic expectations and to focus on creating a healthy skincare routine.
Step 12: Primer Application for Mature Skin Addressing Specific Needs Mature skin has unique needs that require a tailored approach to primer application. As we age, our skin loses collagen and elastin, leading to wrinkles, fine lines, and sagging. Primer can be a valuable tool for addressing these concerns, but it's important to choose the right type of primer and apply it correctly.
For mature skin, look for primers that are hydrating and contain light-reflecting particles. Hydrating primers can help to plump up the skin and reduce the appearance of wrinkles, while light-reflecting particles can help to brighten the complexion and create a more youthful glow. Avoid using mattifying primers, as they can accentuate dryness and fine lines. When applying primer to mature skin, use a gentle, patting motion rather than rubbing or tugging. This can help to prevent further damage to the skin. Pay particular attention to areas with wrinkles and fine lines, gently pressing the primer into these areas to fill them in. You can also use a small brush to apply primer to hard-to-reach areas, such as around the eyes and mouth.
Step 13: Primer and Photography Achieving a Camera-Ready Look For those who frequently find themselves in front of the camera, whether for professional photoshoots or everyday selfies, primer becomes an indispensable tool. Certain primers are specifically formulated to minimize shine and blur imperfections, ensuring a flawless complexion in photos. Look for primers labeled as "HD" or "photo-ready," as these often contain light-diffusing particles that scatter light and create a soft-focus effect.
When using primer for photography, it's important to avoid primers that contain SPF, as SPF can cause a white cast in photos taken with flash. Instead, apply a separate sunscreen before applying your primer. Also, be mindful of the amount of primer you use. Too much primer can create a thick, cakey look, which can be particularly noticeable in photos. Less is more when it comes to primer for photography. Finally, test your makeup in different lighting conditions before taking photos. This will help you to identify any areas that need extra attention and ensure that your makeup looks flawless in any setting.
Step 14: DIY Primer Options When You're in a Pinch While commercially available primers are readily accessible, there may be times when you find yourself without one. In such situations, you can create your own DIY primer using ingredients you likely already have at home. One simple DIY primer option is to use aloe vera gel. Aloe vera gel is a natural moisturizer that can help to smooth the skin and create a base for makeup.
Simply apply a thin layer of aloe vera gel to your face and allow it to dry completely before applying your foundation. Another DIY primer option is to use a milk of magnesia. Milk of magnesia is an over-the-counter antacid that can help to absorb excess oil and control shine. Apply a thin layer of milk of magnesia to your T-zone and allow it to dry completely before applying your foundation. Keep in mind that DIY primers may not be as effective as commercially available primers, but they can be a good option when you're in a pinch. It's also important to patch test any DIY primer on a small area of your skin before applying it to your entire face to ensure that you don't have any adverse reactions.
Step 15: Beyond Makeup: Industrial Primers and Their Applications The principles of priming extend far beyond the realm of cosmetics. In industrial settings, primers play a crucial role in preparing surfaces for coatings and adhesives. These primers are designed to enhance adhesion, protect against corrosion, and improve the overall durability of the finished product. For example, in the automotive industry, primers are used to prepare car bodies for painting. These primers provide a smooth, uniform surface that the paint can adhere to, preventing chipping, peeling, and rust. Similarly, in the construction industry, primers are used to prepare concrete and metal surfaces for coatings and sealants. These primers help to improve adhesion, prevent moisture damage, and extend the lifespan of the finished structure.
The type of primer used in industrial applications depends on the specific materials and environmental conditions. For example, epoxy primers are often used for their excellent adhesion and corrosion resistance, while urethane primers are prized for their flexibility and weather resistance. The application process typically involves cleaning the surface, applying a thin, even coat of primer, and allowing it to dry completely before applying the coating. Just as with makeup primers, proper surface preparation is essential for achieving optimal results with industrial primers.
- Aditi Mistry Nip Slip The Incident That Shocked The World
- My Desi Net Hot Videos Xxx Scenes You Cant Miss
Master Primer Application Step by Step Guide & Flawless Finish!
:max_bytes(150000):strip_icc()/primer3-4c792c79731f4f068f0f8831321b2628.jpg)
Use Of Primer On Face Shop cityofclovis
How To Use Primer Step By Step at Eden Disney blog
